THIS BLOG HAS MOVED!
Greetings, blog readers!
I’ve started a new blog – The Baking Goddess – and will no longer be updating this site. An homage to the ultimate home baker – my lovely grandmother, Bonnie Jean – it will feature all kinds of yummy recipes (not just baked goods!). I hope you’ll visit, and enjoy!
Irish Cream Chocolate Mousse

It’s been a long while since I’ve posted – starting a new job has kept me VERY busy – but I’m thrilled to be back on St. Patrick’s Day sharing this recipe for Irish Cream Chocolate Mousse. Mousses are one of my favorite desserts – they’re quick to assemble, versatile, inexpensive, and decadently rich, not to mention easy to portion and prepare in advance. This recipe – with only 4 ingredients! – combines two classic mousses into one delicious, airy confection. If you don’t like Irish Cream, feel free to substitute with another cream-based liqueur (Dooley’s, Cruzan Rum, etc), or omit it all together.
Happy St. Patrick’s Day, and buon appetito!
IRISH CREAM CHOCOLATE MOUSSE
Serves: 4
4 ounces dark chocolate, chopped
3 fresh egg yolks
1 tbsp Irish cream liqueur
1 cup whipped cream
Chocolate shavings (optional)
1. Place the bowl and beaters of an electric mixer in the refrigerator to chill for 15-20 minutes.
2. Melt the dark chocolate in a double broiler over low heat. Remove from heat and allow to cool.
3. While the chocolate is cooling, whip the cream until soft peaks form. Set aside. In a separate bowl, beat the egg yolks until smooth. Stir in the melted chocolate and Irish cream, then fold in 3/4 of the whipped cream.
4. To serve, pour the mousse into serving glasses and garnish with remaining whipped cream and chocolate shavings (optional).
Mixed Greens with Bosc Pears, Cashews + Cranberries

I don’t know about everyone else, but I ate WAY too much over Thanksgiving. As in, two full turkey dinners too much. While I’d love to post a new recipe for eggnog doughnuts or mulled wine this week, the safest bet is probably something a wee bit more healthy. This festively colored salad – with fresh bosc pears, salted cashews, dried cranberries, and a sweet orange-raspberry vinaigrette – perfectly fits the bill. The recipe – originally featured in the December 2000 issue of Sunset magazine – makes 16 small servings, so adjust the ingredients accordingly. Enjoy, and buon appetito!
MIXED GREENS WITH BOSC PEARS, CASHEWS + CRANBERRIES
1 ½ tsp freshly grated orange peel
1/3 cup freshly squeezed orange juice
½ cup raspberry vinegar
¼ cup salad oil
2 tbsp honey
1 cup sweetened dried cranberries
3 fresh firm-ripe Bosc pears
1 1/3 pound mixed salad greens, rinsed + crisped
1 cup roasted salted cashews
Salt
Freshly ground black pepper
1. In a wide 10- to 12-quart bowl, mix orange peel, orange juice, vinegar, oil and honey. Add cranberries and stir to incorporate.
2. Rinse, dry, quarter and core pears. Cut lengthwise into ¼-inch-thick slices or chop into 1-inch chunks. Place in bowl with orange mixture and mix gently.
3. Add salad greens and cashews. Mix gently to coat with dressing. Add salt and pepper to taste.
Pumpkin Eggnog Custard

It’s with great sadness that I post my last pumpkin recipe of the year. This one – for pumpkin eggnog custard – happens to be one of my favorites, as it’s essentially pumpkin pie filling with a hint of eggnog. The result is a creamy, rich pumpkin pudding without the hassle of a pie crust. Because seriously, crust … ain’t nobody got time for that!
While I’m not a huge fan of pumpkin pie spice (I like the ability to control the amount and variety of spice in the custard), use it if it’s all you have on hand. I also find the custard bakes more evenly when the ramekins are placed in a hot water bath (instructions are below). Enjoy, and buon appetito!
PUMPKIN EGGNOG CUSTARD
Makes: 6 servings
3/4 cup caster sugar
1/2 tsp salt
1 tsp ground cinnamon
1/2 tsp ground ginger
1/4 tsp ground cloves
2 large fresh eggs
15 ounces pumpkin puree
6 fl. oz. evaporated 2% milk
6 fl. oz. eggnog
1. Preheat oven to 350 degrees Fahrenheit (175 degrees Celsius).
2. Mix sugar, salt and spices in a small bowl; set aside. In a large bowl, lightly beat eggs. Add pumpkin and sugar-spice mixture and stir until well combined. Gradually stir in evaporated milk and eggnog.
3. Divide custard batter between 6 ramekins and place in large casserole dish. Add hot water to the dish until it reaches halfway up the sides of the ramekins. Bake for 40 to 50 minutes, or until a knife inserted into the center of the custard comes out clean. Serve cold or slightly warm.
Pumpkin Cupcakes with Cream Cheese Frosting

While the entire food blogosphere is blowing up with love for pie this week – and why not? pie IS glorious! – I decided to shake things up a bit with a recipe for pumpkin cupcakes.
Before I go any further, it’s time for a mea culpa: I, Brooke ____, usually make cupcakes from a box of cake mix. Yes, it’s true.
*ducks behind laptop screen*
The fact of the matter is, I LIKE how cupcakes from a mix taste, and I LOVE their soft, fluffy consistency. Is that such a crime? Well, sort of, particularly given the title of this blog (cucina fresca roughly translates to fresh kitchen, meaning the point is to make these dishes and confections from scratch). So, when preparing a dessert for an impromptu Halloween get-together last month, I wanted to expand my cupcake-making horizons. The result? Cupcakes softer, fluffier and better tasting than anything out of a box. Hallelujah!
This recipe is a creation of Martha Stewart’s, with slight variation in the amount and type of spice incorporated. I topped these wee cakes with a simple cream cheese frosting (recipe below) and crumbled ginger snap cookies. They are, however, just as tasty warm and naked out of the oven :)
If you’re not in the market for pie this week – or would like to feature a pumpkin alternative at your Thanksgiving festivities – I highly recommend this recipe. Enjoy, and buon appetito!
PUMPKIN CUPCAKES WITH CREAM CHEESE FROSTING
Makes: 24 cupcakes
For the cupcakes:
2 cups all-purpose flour
1 tsp baking soda
1 tsp baking powder
1 tsp coarse salt
1 tsp ground cinnamon
1 tsp ground ginger
1/4 tsp grated nutmeg
1/8 tsp nutmeg
1 cup packed light brown sugar
1 cup granulated sugar
1 cup (2 sticks) butter, melted + cooled
4 large eggs, lightly beaten
15 ounces pumpkin puree
For the frosting:
4 ounces unsalted butter, softened
4 ounces cream cheese, softened
2 cups powdered sugar
1 tsp pure vanilla extract
5 to 6 ginger snap cookies, finely crumbled (optional)
For the cupcakes:
1. Preheat oven to 350 degrees Fahrenheit. Line cupcake pans with paper liners; set aside. In a medium bowl, whisk together flour, baking soda, baking powder, salt and spices. Set aside.
2. In a large bowl, whisk together brown sugar, granulated sugar, butter and eggs. Add dry ingredients and whisk until smooth. Stir in pumpkin puree.
3. Divide batter evenly among liners, filling each about halfway. Bake until tops spring back when touched, and a cake tester inserted in the center comes out clean (approximately 20 to 25 minutes). Transfer to wire rack; cool completely before frosting.
For the frosting:
1. While the cupcakes are baking and cooling, make the frosting. In a large bowl, beat together the butter and cream cheese with an electric mixer. With the mixer on low speed, add the powdered sugar one cup at a time until smooth and creamy. Beat in vanilla extract.
2. Frost cupcakes and, if desired, top with crumbled ginger snaps.
Macaroni and Cheese

As temperatures drop throughout most of the country (although not in southern California – it was 80 bloody degrees here today!), I thought it was time to feature a recipe for one of my all-time favorite comfort foods: macaroni and cheese. While there are roughly a zillion recipes for this classic pasta dish on the Internet, the one listed below takes on a decidedly French flair with the addition of béchamel and Comté cheese. The result? A rich, creamy, and delicious macaroni that will knock your freakin’ socks off. Seriously, make this immediately – I promise you won’t regret it!
Buon appetito!
MACARONI AND CHEESE
Serves: 6
For the béchamel
4 cups (1 quart) whole milk
1 stick unsalted butter
1/2 cup all-purpose flour
1 1/2 tbsp kosher salt
To assemble
Kosher salt
1 pound elbow macaroni
10 ounces extra sharp cheddar cheese (about 4 cups shredded)
2 ounces Comté cheese (about 3/4 cup shredded)
1/2 tsp English mustard
1/2 cup panko crumb
For the béchamel:
1. Heat whole milk in a saucepan over medium heat just until it comes to a simmer. Remove from heat and set aside.
2. In a large, heavy-bottomed saucepan, melt butter over medium heat. Add the flour and whisk constantly until the mixture turns light brown in color (approximately 3 minutes). Remove from heat.
3. Whisking constantly, slowly add the hot milk to the butter-flour mixture until evenly combined and smooth.
4. Return the saucepan to medium-high heat and cook, whisking constantly, until the sauce thickens and coats the back of a spoon (approximately 2 to 3 minutes). Stir in one tablespoon of salt, taste, and add remaining salt if desired. Remove from heat and set aside.
To assemble:
1. Bring a large pot of heavily salted water to a boil over high heat. Add the pasta and cook until just al dente (approximately 9 minutes). Drain, rinse with cold water, and set aside.
2. Preheat oven to 400 degrees Fahrenheit (200 degrees Celsius).
3. Place the reserved saucepan of béchamel over medium heat. Stir in cheeses and mustard until melted and smooth. Add the pasta and stir to combine. Transfer to a 5-quart baking dish, sprinkle with panko, and bake for 25 to 30 minutes.
Masala Chai Tea

I’ve been wracking my brain all week trying to write something clever and/or witty for this blog post, and I’ve officially got nothing. As in: nada, niente, nichts, bupkis. My conclusion? I’d rather sip my chai than write about it, and I’ve put off posting this recipe long enough. Without further ado, I give you – masala chai!
MASALA CHAI TEA
Makes: three 8-ounce servings
Note: All of the following ingredients may be varied to suit individual tastes. When I make it again, I will probably omit the anise, add more cardamom and perhaps use slightly more brown sugar (I enjoy my chai very sweet!). Feel free to tinker around with this list – and add other spices, if desired – until you’ve made your perfect cup of chai.
1 cinnamon stick
1 tsp whole black peppercorns
1 star anise
6 whole cloves
4 cardamom pods
1-inch piece fresh ginger root, sliced thinly into rounds
2 1/2 cups cold water
2 1/2 cups whole milk
3 tsp loose leaf black tea (preferably Assam or Darjeeling)
1/4 cup packed light brown sugar
1. Combine the first six ingredients in a medium-sized (preferably spouted) saucepan. Using a mallet or the back of a heavy spoon, lightly crush or bruise the spices. Add the water, milk and tea leaves, heating over medium heat until small bubbles appear around the perimeter of the pan. Stir to prevent the milk from scalding and continue heating until the chai comes to a boil. Turn off heat, stir well, and allow to steep for 3 to 5 minutes.
2. Divide brown sugar equally into three individual tea cups. Strain chai through a fine mesh sieve and pour into cups, stirring well before drinking.
Pumpkin Bundt Cake

Much to my surprise, I discovered earlier this week that I haven’t featured a single cake recipe on this blog over the course of its nearly 3 year existence. This was a somewhat shocking development, particularly considering how much (and often) I enjoy a delicious fetta di torta.
It is my pleasure, therefore, to feature this seasonally-appropriate – and exceptionally yummy – recipe for pumpkin cake. This torta holds a very special place in my heart, as it was a particular favorite of my beloved grandmother, the late (and great) Bonnie Jean. She baked this cake – a moist bundt chocked full of walnuts and semi-sweet chocolate chips – each and every year throughout my childhood. Its appearance always coincided with falling leaves, crisp morning air, and steaming mugs of apple cider; it was, and will always be, my favorite culinary harbinger of fall.
Enjoy served slightly warm with or without ice cream. Leftovers hold up very well to several weeks of freezing. Buon appetito!
PUMPKIN BUNDT CAKE
Serves: 12
2 cups sifted all-purpose flour
2 tsp baking powder
1 tsp baking soda
1/2 tsp salt
1 1/2 tsp ground cinnamon
1/2 tsp ground cloves
1/4 tsp ground ginger
1/4 tsp ground allspice
2 cups finely granulated sugar
4 fresh eggs
2 cups pureed pumpkin
1 cup vegetable oil
1 1/2 cups bran flakes
1 cup semi-sweet chocolate chips
1 cup coarsely chopped walnuts
Confectioner’s sugar
1. Preheat oven to 350 degrees Fahrenheit (175 degrees Celsius). Lightly oil a bundt pan and set aside.
2. In a large mixing bowl, combine flour, baking powder, baking soda, salt, cinnamon, cloves, allspice, ginger, and caster sugar. Add eggs one at a time to dry ingredients and whisk well.
3. Add pumpkin and vegetable oil and stir until thoroughly combined. Gently stir in bran flakes, semi-sweet chocolate and walnuts.
4. Pour into prepared bundt pan and bake for 1 hour and 10 minutes, or until cake tester inserted in cake comes out clean.
5. Invert onto a wire rack and cool completely. Dust with confectioner’s sugar before serving.
Savory Butternut Squash Bake
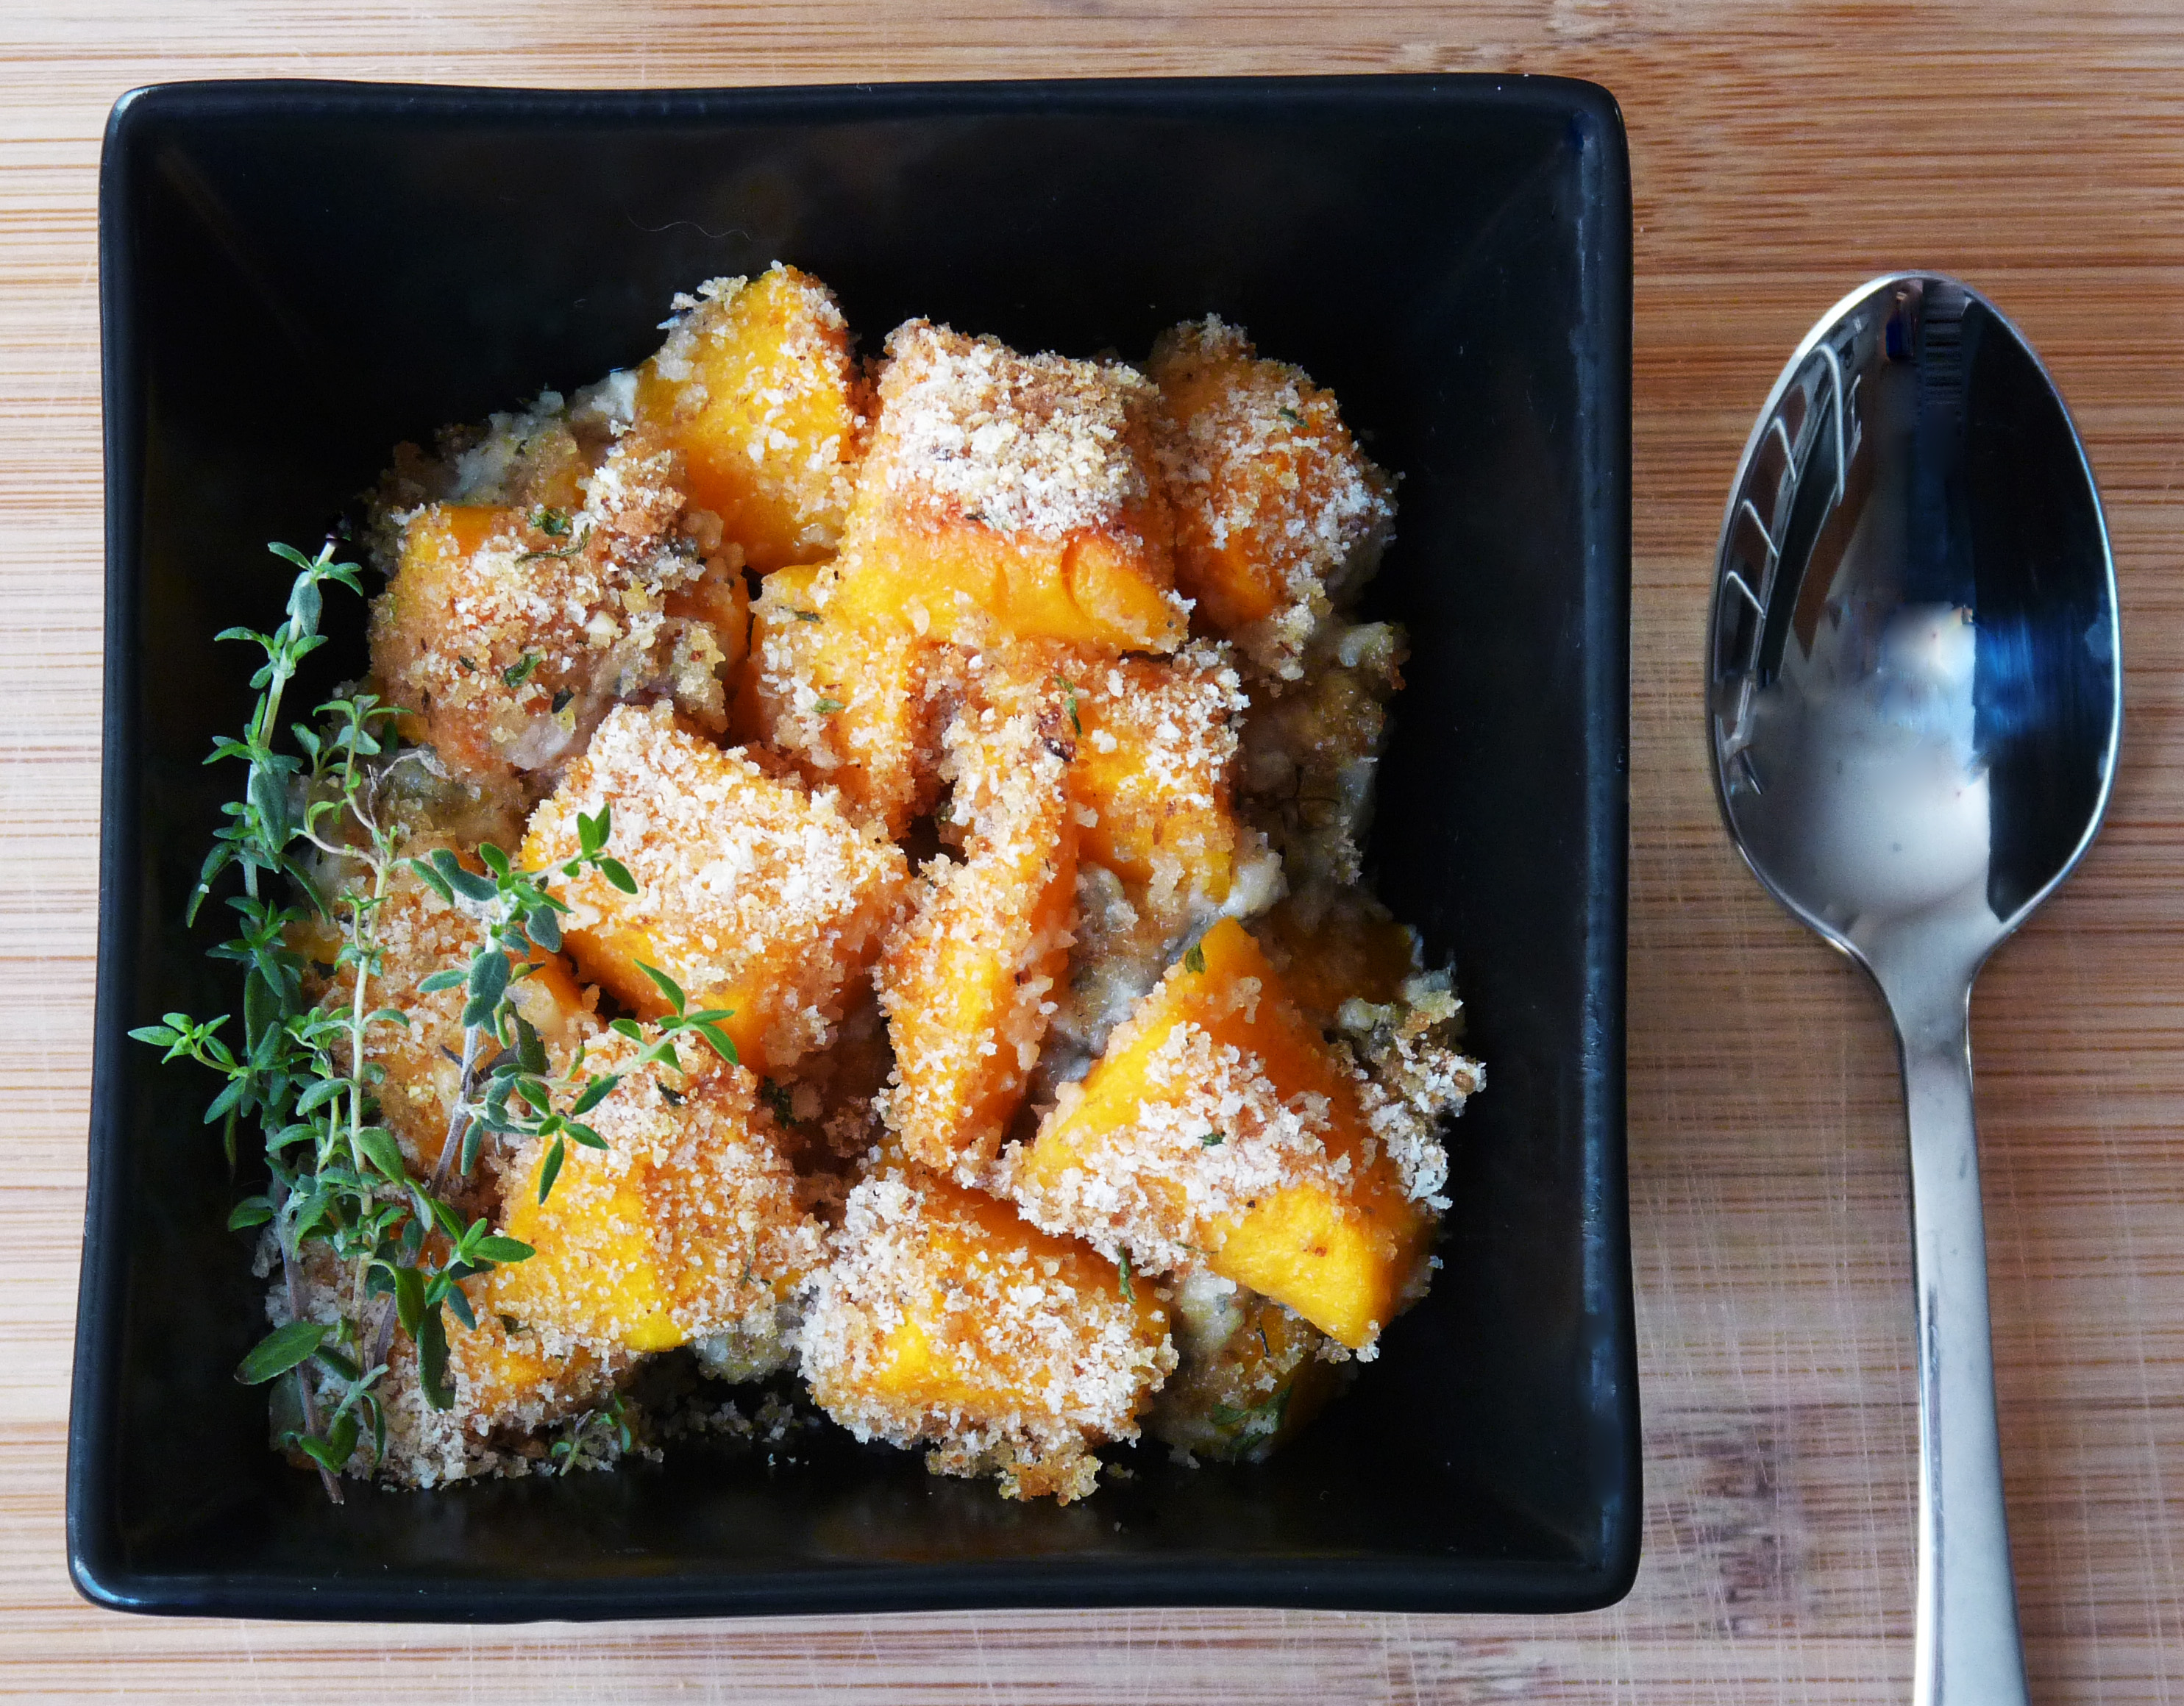
Sometimes I put a lot of effort into making these blog posts clever or witty, but today is not the day for that kind of rubbish. Instead, today is the day for stuffing your face with this AWESOME CHEESY SQUASH BAKE!
I know what you’re thinking: butternut squash and blue cheese? Gross! But holy cow, this recipe was a huge, very pleasant surprise. Some of my guests thought it tasted like stuffing, while others compared it to rich, cheesy mashed potatoes, but all agreed it was absolutely delicious. It takes less than one hour to prepare from start to finish, but can also be assembled (and refrigerated) up to one day in advance of baking. If you’re on the lookout for a new, vegetarian-friendly side or main dish, I can’t recommend this more highly. Enjoy, and buon appetito!
SAVORY BUTTERNUT SQUASH BAKE
Serves: 4-6
1 (4 pound) butternut squash (peeled, seeded + cubed)
1/3 yellow onion, minced
1/4 cup extra-virgin olive oil
3/4 cup Italian bread crumbs
1 tbsp minced fresh thyme
4 ounces crumbled blue cheese*
Sea salt, to taste
Freshly ground black pepper, to taste
*If you don’t care for the blue cheese in this recipe, feta and goat’s cheese are great substitutes!
1. Preheat oven to 425 degrees Fahrenheit (220 degrees Celsius).
2. Toss the squash, onion, olive oil, 1/2 cup bread crumbs, thyme, and blue cheese in a large mixing bowl. Sprinkle with salt and pepper. Pour the mixture into an 8×8-inch baking dish. Sprinkle remaining 1/4 cup breadcrumbs over the squash.
3. Bake in preheated oven until lightly browned on top, 35 to 45 minutes.
Rustic Apple Galette

Despite Mother Nature’s continued refusal to acknowledge the obvious – that it is, in fact, AUTUMN in southern California – I have decided to forge ahead with my collection of fall recipes. The first dessert feature of the season goes to this rustic apple galette: a free-form, crusty tart filled with lightly sweetened apples. I found the recipe – originally contributed by the legendary Jacques Pépin and Grace Parisi – in the September 2003 edition of Food & Wine magazine. I made only minor variations (because seriously, you don’t fool around with a Pépin creation!), and absolutely LOVE the result. With buttery, flaky crust and insanely delicious filling, this tart is already lodged in my ‘make this again ASAP’ folder!
A couple of notes: first, this is – HANDS DOWN – the best and easiest pie crust I’ve ever made. I’ve experimented with dozens of recipes over the past decade, and this one beats them all by leaps and bounds. The dough is incredibly easy to assemble and manipulate (there’s no chilling required!), and bakes up like an absolute dream! Second, I highly recommend following Pépin and Parisi’s instruction to use Golden Delicious apples. As the picture above indicates, I used Granny Smiths – this was an unfortunate mistake. While they hold up well to baking, I found them slightly too tart for this recipe. If you aren’t able to find Golden Delicious at your local grocer or farmer’s market (as I wasn’t), substitute with a sweeter variety like Honeycrisp, Mutsu or Pink Lady.
This galette is heaven served warm with vanilla bean ice cream. If you’d like to make ahead or have leftovers (good luck!), the baked tart can be stored overnight at room temperature and reheated in a 325 degree Fahrenheit (160 degree Celsius) oven. Enjoy, and buon appetito!
RUSTIC APPLE GALETTE
Serves: 6
1 1/2 cups + 1 tbsp all-purpose flour
Pinch of salt
1 1/2 sticks (6 ounces) cold unsalted butter (cut into 1/2-inch pieces), + 2 tbsp, melted
1/3 cup ice water
3 1/2 tbsp finely granulated sugar
4 large Golden delicious apples (peeled, cored and cut into 1/4-inch-thick slices)
1. In a large food processor, pulse 1 1/2 cups flour with the salt. Add the cold butter and process just until the butter is the size of peas (approximately 5 seconds). Sprinkle with ice water and process just until moistened (approximately 5 seconds). Transfer the dough to a lightly floured work surface and knead 2 or 3 times, just until it comes together. Pat the dough into a disk and roll into a 16- or 17-inch round approximately 1/4-inch thick.
2. Line a large baking sheet with parchment paper. Transfer the dough to the parchment (rolling the dough around your rolling pin helps considerably with this step!).
3. In a small bowl, combine 2 tablespoons of the sugar with the remaining 1 tablespoon of flour and sprinkle over the dough. Arrange the apple slices on top in overlapping concentric circles to within approximately 3 inches of the edge. Fold the dough over the apples in a free-form fashion. Brush the apples with the melted butter and sprinkle with the remaining 1 1/2 tablespoons of sugar. Refrigerate the unbaked tart for 10 minutes.
4. Preheat oven to 400 degrees Fahrenheit (200 degrees Celsius). Bake the tart in the center of the oven for 1 hour, or until the apples are tender and golden and the crust is deep golden and cooked through. Slide the parchment onto a wire rack and let the tart cool slightly before serving.
